How to store big binary files with git lfs on Google Drive or One Drive?
Transfer adapter
I suggest connecting git lfs with custom transfer adapter. According to git-lfs documentation:
Git LFS supports multiple ways to transfer (upload and download) files. In the core client, the basic way to do this is via a one-off HTTP request via the URL returned from the LFS API for a given object. The core client also supports extensions to allow resuming of downloads (via Range headers) and uploads (via the tus.io protocol).
Usage examples
I used this approach to storage media files in my software development project and game dev project. I bet you can do it too. In the most cases I like to use it for:
- game dev projects in game engines like Unity and Unreal Engine.
- dbdumps storage
- big media files storage (in case you need a one)
There are always a way to do it for another kind of projects.
In example bellow I will be using gitlab, google drive and other tools.
Gitlab setup
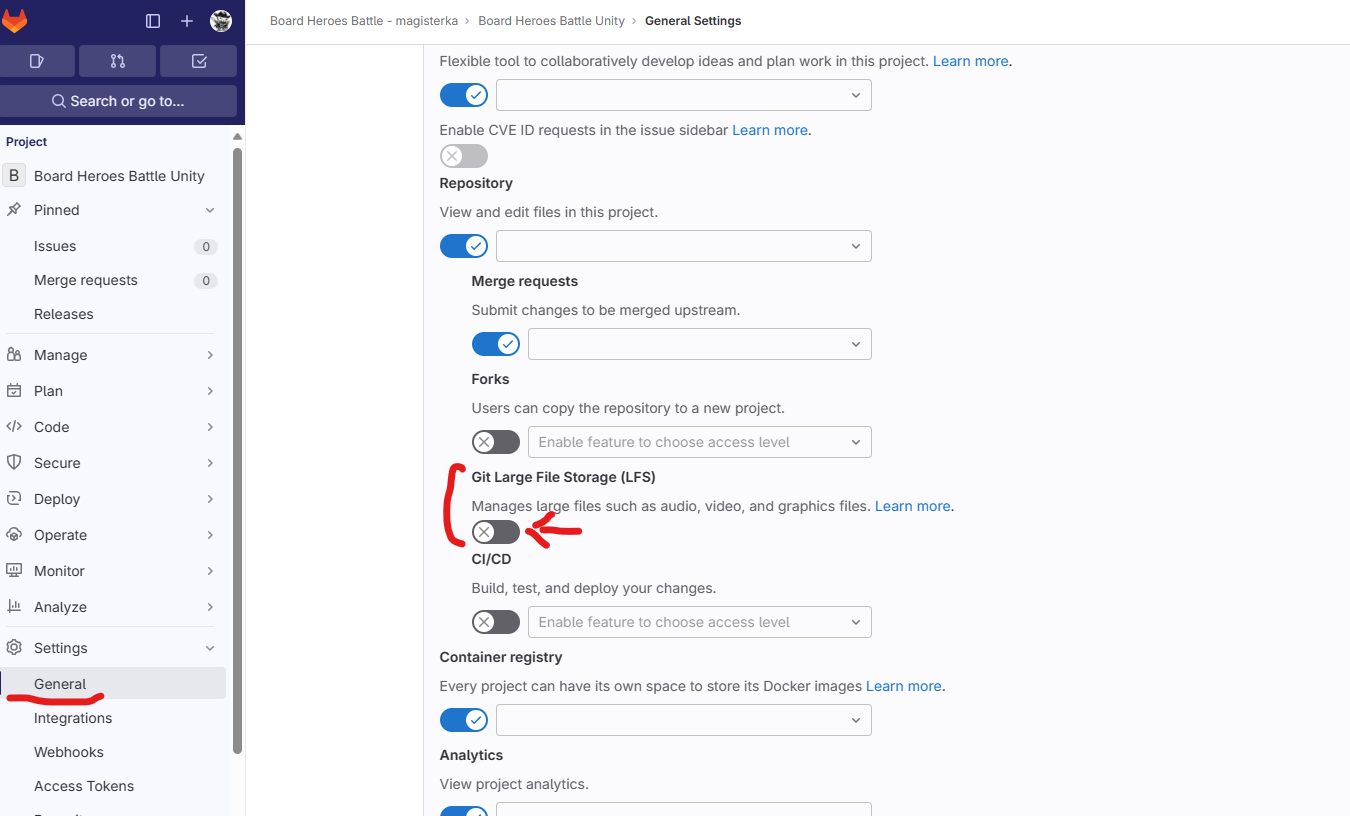
Firstly you need to disable default lfs service of gitlab. It’s very vell documented feature in official documentation Gitlab but there is not much information how to disable it.
It’s a litle tricky and not really user friendly but obviously you need to select your repository and dive into settings.


Although!

There is another way also via gitlab cli, and to CI tools too via environment variables but I will not cover this, let’s keep it simple.
If giltab lfs is disabled on remote you can start with local setup.
Local repository setup
You will need a new repository or use existing one. I suggest starting with fresh state so you can go with easier setup guide bellow.
git init
Add also remote server link. That can be done after setup or later. For gitlab you can follow simple tutorial link to git
Lfs setup
Download a lfs adapter tool from available releases.

Download, unzip, install it to some good known location. For example make a new folder in you main work disk like this C:\Tools so full path to the tool will be like this C:\Tools\lfs-folderstore.exe.
To set up repo with lfs please add .gitattributes file in your repository. For examples check this link.
Unity .gitattributes
## in root

*.cs diff=csharp text
*.cginc text
*.shader text

*.mat merge=unityyamlmerge eol=lf
*.anim merge=unityyamlmerge eol=lf
*.unity merge=unityyamlmerge eol=lf
*.prefab merge=unityyamlmerge eol=lf
*.physicsMaterial2D merge=unityyamlmerge eol=lf
*.physicMaterial merge=unityyamlmerge eol=lf
*.asset merge=unityyamlmerge eol=lf -text
*.meta merge=unityyamlmerge eol=lf
*.controller merge=unityyamlmerge eol=lf

## git-lfs ##

#Image
*.jpg filter=lfs diff=lfs merge=lfs -text
*.jpeg filter=lfs diff=lfs merge=lfs -text
*.png filter=lfs diff=lfs merge=lfs -text
*.gif filter=lfs diff=lfs merge=lfs -text
*.psd filter=lfs diff=lfs merge=lfs -text
*.ai filter=lfs diff=lfs merge=lfs -text
*.tif filter=lfs diff=lfs merge=lfs -text

#Audio
*.mp3 filter=lfs diff=lfs merge=lfs -text
*.wav filter=lfs diff=lfs merge=lfs -text
*.ogg filter=lfs diff=lfs merge=lfs -text
#Wwise
*.bnk filter=lfs diff=lfs merge=lfs -text

#Video
*.mp4 filter=lfs diff=lfs merge=lfs -text
*.mov filter=lfs diff=lfs merge=lfs -text

#3D Object
*.FBX filter=lfs diff=lfs merge=lfs -text
*.fbx filter=lfs diff=lfs merge=lfs -text
*.blend filter=lfs diff=lfs merge=lfs -text
*.obj filter=lfs diff=lfs merge=lfs -text

#ETC
*.a filter=lfs diff=lfs merge=lfs -text
*.exr filter=lfs diff=lfs merge=lfs -text
*.tga filter=lfs diff=lfs merge=lfs -text
*.zip filter=lfs diff=lfs merge=lfs -text
*.dll filter=lfs diff=lfs merge=lfs -text
*.unitypackage filter=lfs diff=lfs merge=lfs -text
*.aif filter=lfs diff=lfs merge=lfs -text
*.ttf filter=lfs diff=lfs merge=lfs -text
*.rns filter=lfs diff=lfs merge=lfs -text
*.reason filter=lfs diff=lfs merge=lfs -text
*.lxo filter=lfs diff=lfs merge=lfs -text
Unreal Engine .gitattributes
## Unreal Engine
## Auto detect text files and perform LF normalization ##

* text=auto

# UE file types
*.uasset filter=lfs diff=lfs merge=lfs -text
*.umap filter=lfs diff=lfs merge=lfs -text
*.udk filter=lfs diff=lfs merge=lfs -text
*.upk filter=lfs diff=lfs merge=lfs -text

--------------------------------------------------

# 2D formats
# Read more in: https://docs.unrealengine.com/4.26/en-US/RenderingAndGraphics/Textures/Importing/

# Recommended use:
*.[tT][gG][aA] filter=lfs diff=lfs merge=lfs -text
*.[pP][nN][gG] filter=lfs diff=lfs merge=lfs -text
*.[bB][mM][pP] filter=lfs diff=lfs merge=lfs -text

# Can also be used:
*.[fF][lL[oO][aA][tT] filter=lfs diff=lfs merge=lfs -text
*.[jJ][pP][eE][gG] filter=lfs diff=lfs merge=lfs -text
*.[jJ][pP][gG] filter=lfs diff=lfs merge=lfs -text
*.[pP][cC][xX] filter=lfs diff=lfs merge=lfs -text
*.[pP][sS][dD] filter=lfs diff=lfs merge=lfs -text
*.[xX][cC][fF] filter=lfs diff=lfs merge=lfs -text
*.[tT][iI][fF] filter=lfs diff=lfs merge=lfs -text
*.[tT][iI][fF][fF] filter=lfs diff=lfs merge=lfs -text

# Other supported formats:
*.[hH][dD][rR] filter=lfs diff=lfs merge=lfs -text
*.[dD][dD][sS] filter=lfs diff=lfs merge=lfs -text
*.[eE][xX][rR] filter=lfs diff=lfs merge=lfs -text

--------------------------------------------------

# 3D formats

# Always recommended to use:
# The UE4 FBX import pipeline uses FBX 2018
*.[fF][bB][xX] filter=lfs diff=lfs merge=lfs -text

# Can also be used:
*.[oO][bB][jJ] filter=lfs diff=lfs merge=lfs -text

# Other supported formats:
*.[aA][bB][cC] filter=lfs diff=lfs merge=lfs -text
*.[sS][rR][tT] filter=lfs diff=lfs merge=lfs -text

--------------------------------------------------

# Audio formats
# Read more in: https://docs.unrealengine.com/4.27/en-US/WorkingWithAudio/Overview/#:~:text=Unreal%20Engine%204%20(UE4)%20supports,16%2Dbit%20format%20PCM%20files.

# Always recommended to use:
*.[wW][aA][vV] filter=lfs diff=lfs merge=lfs -text

# Can also be used:
*.[aA][iI][fF][fF] filter=lfs diff=lfs merge=lfs -text
*.[oO][gG][gG] filter=lfs diff=lfs merge=lfs -text
*.[fF][lL][aA][cC] filter=lfs diff=lfs merge=lfs -text

# Not recommended to use, but supported:
*.[mM][pP]3 filter=lfs diff=lfs merge=lfs -text
*.[wW][mM][aA] filter=lfs diff=lfs merge=lfs -text
*.[aA][cC]3 filter=lfs diff=lfs merge=lfs -text
*.[aA][mM][rR] filter=lfs diff=lfs merge=lfs -text
*.[aA][iI][fF] filter=lfs diff=lfs merge=lfs -text
*.[aA][uU] filter=lfs diff=lfs merge=lfs -text
*.[cC][dD][dD][aA] filter=lfs diff=lfs merge=lfs -text
*.[cC][aA][fF] filter=lfs diff=lfs merge=lfs -text
*.[bB][wW][fF] filter=lfs diff=lfs merge=lfs -text
*.[aA][dD][tT][sS] filter=lfs diff=lfs merge=lfs -text

--------------------------------------------------

# Video formats
# Read more in: https://docs.unrealengine.com/5.0/en-US/media-framework-technical-reference-for-unreal-engine/

# Always recommended to use, supports all platforms:
# For the best compatibility and performance, it is recommended to use H.264 encoded MP4 (.mp4) container files.
*.[mM][pP]4 filter=lfs diff=lfs merge=lfs -text

# Can also be used, only some platforms are supported:
*.3[gG]2 filter=lfs diff=lfs merge=lfs -text
*.3[gG][pP] filter=lfs diff=lfs merge=lfs -text
*.3[gG][pP]2 filter=lfs diff=lfs merge=lfs -text
*.3[gG][pP][pP] filter=lfs diff=lfs merge=lfs -text
*.[mM]4[aA] filter=lfs diff=lfs merge=lfs -text
*.[mM]4[vV] filter=lfs diff=lfs merge=lfs -text
*.[mM][o][vV] filter=lfs diff=lfs merge=lfs -text
*.[aA][sS][fF] filter=lfs diff=lfs merge=lfs -text
*.[aA][vV][iI] filter=lfs diff=lfs merge=lfs -text
*.[wW][mM][vV] filter=lfs diff=lfs merge=lfs -text

--------------------------------------------------

# Fonts
# Read more in: https://docs.unrealengine.com/5.0/en-US/importing-fonts-in-unreal-engine/

*.[tT][tT][fF] filter=lfs diff=lfs merge=lfs -text
*.[oO][tT][fF] filter=lfs diff=lfs merge=lfs -text

--------------------------------------------------

# Documents
*.[cC][sS][vV] filter=lfs diff=lfs merge=lfs -text
Goolge Drive Setup
If repo is ready, you will need some kind of disk space to make it works. So to fully integrate it use Google Drive Client Download. Install it and login so you can create a folder to store all big binary data.
After loging you should be able to see your mounted folder in Finder in case using Mac or Windows Explorer as seperated disk. Open it and create a new folder there with name binary-lfs. That name will be used to store all binary data for you project in lfs setup.
Git config integration
If you have done right everything now it’s a time to connect git-lfs with our tool and google drive.
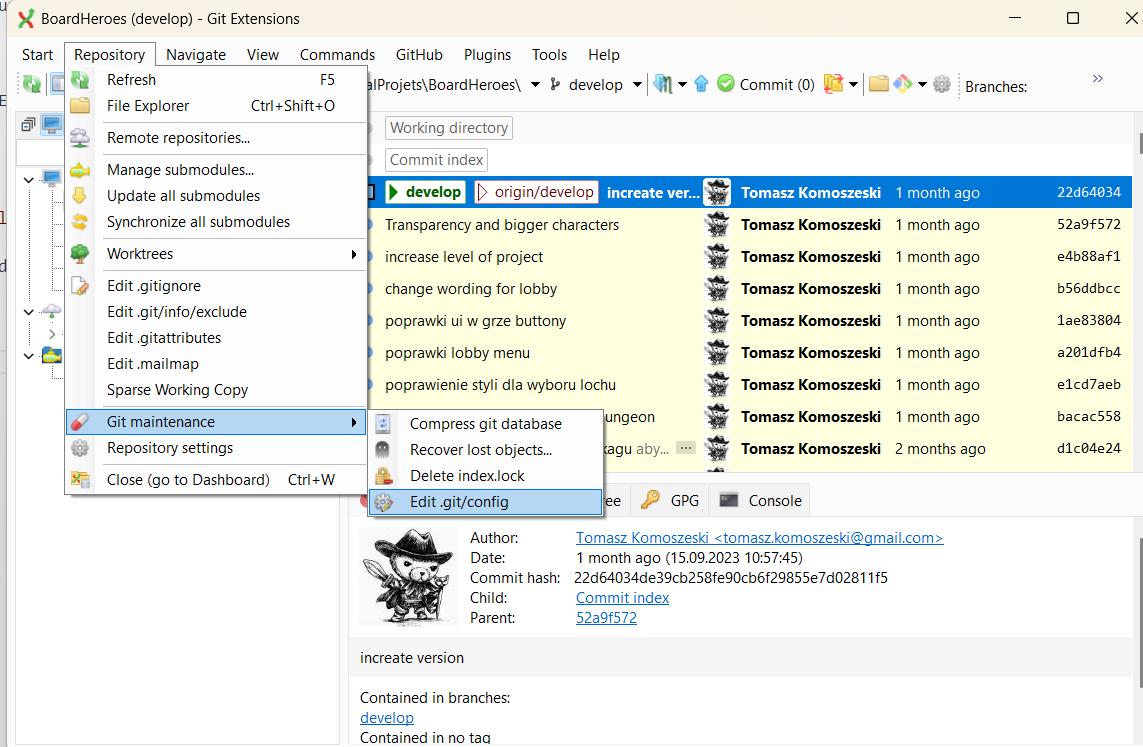
I used my favorite open-source GitExtension software as reference for integration, but you can use terminal by using git config approach or any kind of text editor. In case using text editor open up config file inside hidden .git folder inside root folder of your project repository.
To open up the configuration of your github repository choose following option:

Open it up and append following lines, similar as inside Cloning a repo
[lfs "customtransfer.lfs-folder"]
    path = C:\\Tools\\lfs-folderstore.exe
    args = 'I:\\My drive\\binary-lfs'
[lfs]
    standalonetransferagent = lfs-folder
    repositoryformatversion = 0
Afterwards you should be good to go, afterwards remember to sort out the LFS files in your checkout and copy the content from the now-configured shared folder, by using following command
git reset --hard master
or if you are using fresh repository simply push it
git push -u origin main
Troubleshooting
Sometimes there could be some problems with your network or issues with git lfs In case of smudge errors or problems you can use following hacks:
- try using better internet connection low network bandwidth is not helping
- restart computer
- use
git lfs fetch --allfetch git lfs files for ALL remote branches - move your google drive or one drive directory cache to new folder and try to download the data again
Bibliography and sources
Enjoy Reading This Article?
Here are some more articles you might like to read next: